AWA Core
Initialization
The AWA application is represented by the Application type which should
be extended for the final application to provide the modules and specific
components of the final application.
The initialization of an AWA application is made in several steps
represented by different procedures of the main Application type.
The whole initialization is handled by the Initialize procedure
which gets a first set of configuration properties and a factory
to build specific component.
The Initialize procedure will perform the following steps:
- It uses the factory to allocate the ASF lifecycle handler, the navigation handler, the security manager, the OAuth manager, the exception handlers.
- It calls the
Initialize_Componentsprocedure to let the application register all the ASF components. These components must be registered before any configuration file is read. - It calls the
Initialize_Config - It calls the
Initialize_Servletsprocedure to allow the application to register all the servlet instances used by the application. - It calls the
Initialize_Filtersprocedure to allow the application to register all the servlet filter instances. The application servlets and filters must be registered before reading the global configuration file. - It loads the global application configuration by reading the
awa.xmlfile as well as some application specific files. By reading this configuration, some global configuration is established on the servlets, filters, navigation rules. The list of XML files loaded during this step is controlled by theapp.configconfiguration. - It calls the
Initialize_Modulesprocedure so that all the application modules can be registered, configured and initialized. Each module brings its own component, servlet and filter. They are configured by their own XML configuration file. - It loads the module application configuration by reading the XML
files described by the
app.config.pluginsconfiguration. This last step allows the application to setup and update the configuration of all modules that have been registered.
Configuration
The following global configuration parameter are defined:
| Name | Description |
|---|---|
| awa_url_scheme | The application URL scheme to use when building URL. |
| #{empty app_url_scheme ? 'http://' : app_url_scheme} | |
| awa_url_host | The application URL host to use when building URL. |
| #{empty app_url_host ? 'localhost' : app_url_host} | |
| awa_url_port | The application TCP port to use when building URL. |
| #{empty app_url_port ? ':8080' : app_url_port} | |
| app_url_base | The application URL base to use when building URL. |
| #{empty app_url_base ? 'http://localhost:8080' : app_url_base} | |
| app_oauth_url_base | |
| #{empty app_oauth_url_base ? 'http://localhost:8080' : app_oauth_url_base} | |
| app_page_500_report | Controls the level of information that is printed by the 500 error page when an error occurs. When full, report the full stack track if available, when minimal report minimal information but without a stack track, when 'none' don't give any information. |
| #{empty app_page_500_report ? 'full' : app_page_500_report} | |
| view.ext | Defines the extension used for Ada Server Faces presentation pages. |
| .html | |
| view.dir | Defines a list of paths separated by ';' where the XHTML files are searched. The default searches for the 'web' directory in the application search paths. |
| #{fn:composePath(app_search_dirs,'web')} | |
| content-type.default | Defines the default content type for the file servlet. |
| text/plain | |
| ado.queries.load | Controls whether the database query definitions are loaded. |
| true | |
| ado.queries.paths | Defines a list of paths separated by ';' where the database query files are searched. The default searches for the 'db' directory in the application search paths. |
| #{fn:composePath(app_search_dirs,'db')} | |
| ado.migrate.paths | Defines a list of paths separated by ';' where the database migration files are searched. The default searches for the 'db/migrate' directory in the application search paths. |
| #{fn:composePath(app_search_dirs,'db/migrate')} | |
| bundle.dir | Defines a list of paths separated by ';' where the resource bundle files are searched. The default searches for the 'bundles' directory in the application search paths. |
| #{fn:composePath(app_search_dirs,'bundles')} | |
| app.modules.dir | Defines a list of paths separated by ';' where the module configuration files are searched. The default searches for the 'config' directory in the application search paths. |
| #{fn:composePath(app_search_dirs,'config')} |
AWA Modules
A module is a software component that can be integrated in the web application. The module can bring a set of service APIs, some Ada beans and some presentation files. The AWA framework allows to configure various parts of a module when it is integrated in an application. Some modules are designed to be re-used by several applications (for example a mail module, a users module, ...). Other modules could be specific to an application. An application will be made of several modules, some will be generic some others specific to the application.
Registration
The module should have only one instance per application and it must be registered when the application is initialized. The module instance should be added to the application record as follows:
type Application is new AWA.Applications.Application with record
   Xxx       : aliased Xxx_Module;
end record;
The application record must override the Initialize_Module procedure
and it must register the module instance. This is done as follows:
overriding
procedure Initialize_Modules (App : in out Application) is
begin
   Register (App    => App.Self.all'Access,
             Name   => Xxx.Module.NAME,
             URI    => "xxx",
             Module => App.User_Module'Access);
end Initialize_Modules;
The module is registered under a unique name. That name is used to load the module configuration.
Configuration
The module is configured by using an XML or a properties file. The configuration file is used to define:
- the Ada beans that the module defines and uses,
- the events that the module wants to receive and the action that must be performed when the event is posted,
- the permissions that the module needs and how to check them,
- the navigation rules which are used for the module web interface,
- the servlet and filter mappings used by the module
The module configuration is located in the config directory
and must be the name of the module followed by the file extension
(example: module-name.xml or module-name.properties).
AWA Permissions
The AWA.Permissions framework defines and controls the permissions used by an application
to verify and grant access to the data and application service. The framework provides a
set of services and API that helps an application in enforcing its specific permissions.
Permissions are verified by a permission controller which uses the service context to
have information about the user and other context. The framework allows to use different
kinds of permission controllers. The Entity_Controller is the default permission
controller which uses the database and an XML configuration to verify a permission.
Declaration
To be used in the application, the first step is to declare the permission. This is a static definition of the permission that will be used to ask to verify the permission. The permission is given a unique name that will be used in configuration files:
with Security.Permissions;
...
package ACL_Create_Post is new Security.Permissions.Definition ("blog-create-post");
Checking for a permission
A permission can be checked in Ada as well as in the presentation pages.
This is done by using the Check procedure and the permission definition. This operation
acts as a barrier: it does not return anything but returns normally if the permission is
granted. If the permission is denied, it raises the NO_PERMISSION exception.
Several Check operation exists. Some require no argument and some others need a context
such as some entity identifier to perform the check.
with AWA.Permissions;
...
AWA.Permissions.Check (Permission => ACL_Create_Post.Permission,
                       Entity     => Blog_Id);
Configuring a permission
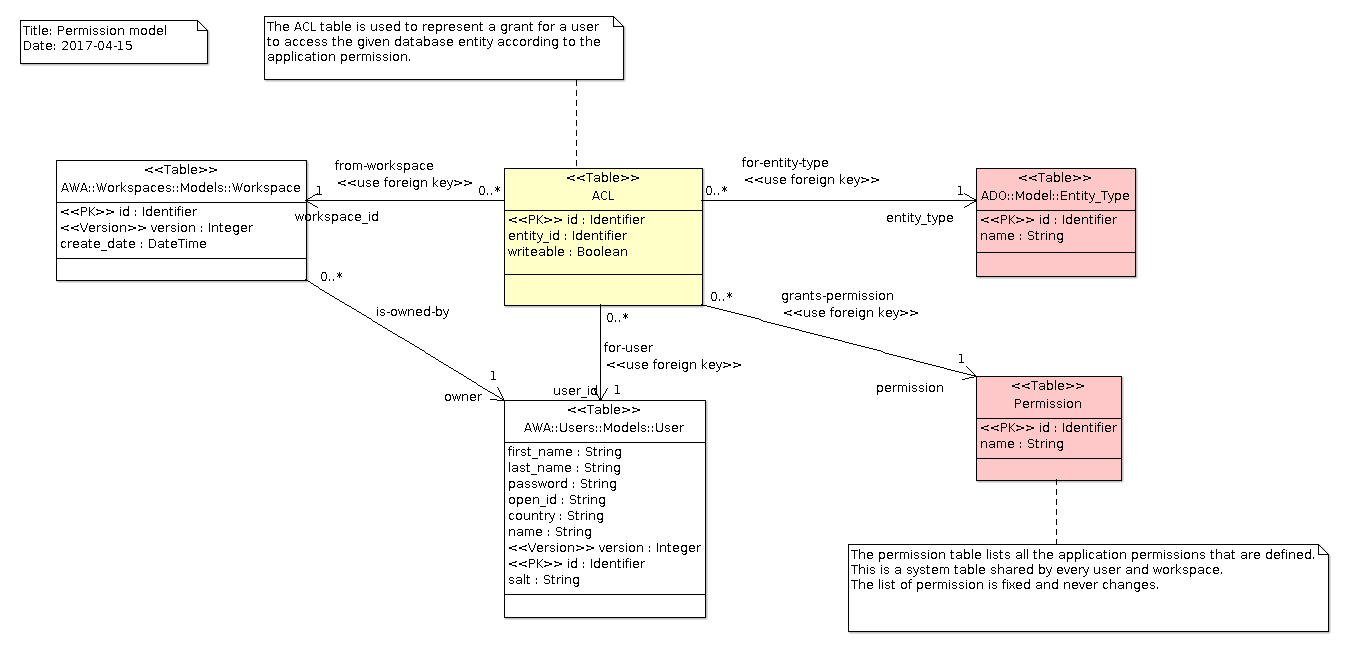
The AWA.Permissions framework supports a simple permission model
The application configuration file must provide some information to help in checking the
permission. The permission name is referenced by the name XML entity. The entity-type
refers to the database entity (ie, the table) that the permission concerns.
The sql XML entity represents the SQL statement that must be used to verify the permission.
<entity-permission>
  <name>blog-create-post</name>
  <entity-type>blog</entity-type>
  <description>Permission to create a new post.</description>
  <sql>
    SELECT acl.id FROM acl
    WHERE acl.entity_type = :entity_type
    AND acl.user_id = :user_id
    AND acl.entity_id = :entity_id
  </sql>
</entity-permission>
Adding a permission
Adding a permission means to create an ACL database record that links a given database
entity to the user. This is done easily with the Add_Permission procedure:
with AWA.Permissions.Services;
...
AWA.Permissions.Services.Add_Permission (Session => DB,
                                         User    => User,
                                         Entity  => Blog);
Data Model
Queries
Queries
| Name | Description |
|---|---|
| check-entity-permission | Get the permission for a user and an entity |
| remove-permission | Delete the permission associated with a user and an object |
| remove-entity-permission | Delete all the permission associated with an object |
| remove-user-permission | Delete all the permission associated with a user |
AWA Events
The AWA.Events package defines an event framework for modules to post
events and have Ada bean methods be invoked when these events are dispatched.
Subscription to events is done through configuration files. This allows to
configure the modules and integrate them together easily at configuration time.
Declaration
Modules define the events that they can generate by instantiating the
Definition package. This is a static definition of the event. Each event
is given a unique name.
with AWA.Events.Definition;
...
package Event_New_User is new AWA.Events.Definition ("new-user");
Posting an event
The module can post an event to inform other modules or the system that
a particular action occurred. The module creates the event instance of
type Module_Event and populates that event with useful properties for
event receivers.
with AWA.Events;
...
Event : AWA.Events.Module_Event;
Event.Set_Event_Kind (Event_New_User.Kind);
Event.Set_Parameter ("email", "harry.potter@hogwarts.org");
The module will post the event by using the Send_Event operation.
Manager.Send_Event (Event);
Receiving an event
Modules or applications interested by a particular event will configure the event manager to dispatch the event to an Ada bean event action. The Ada bean is an object that must implement a procedure that matches the prototype:
type Action_Bean is new Util.Beans.Basic.Readonly_Bean ...;
procedure Action (Bean : in out Action_Bean;
                  Event : in AWA.Events.Module_Event'Class);
The Ada bean method and object are registered as other Ada beans.
The configuration file indicates how to bind the Ada bean action and the event together. The action is specified using an EL Method Expression (See Ada EL or JSR 245).
<on-event name="new_user">
    <action>#{ada_bean.action}</action>
</on-event>
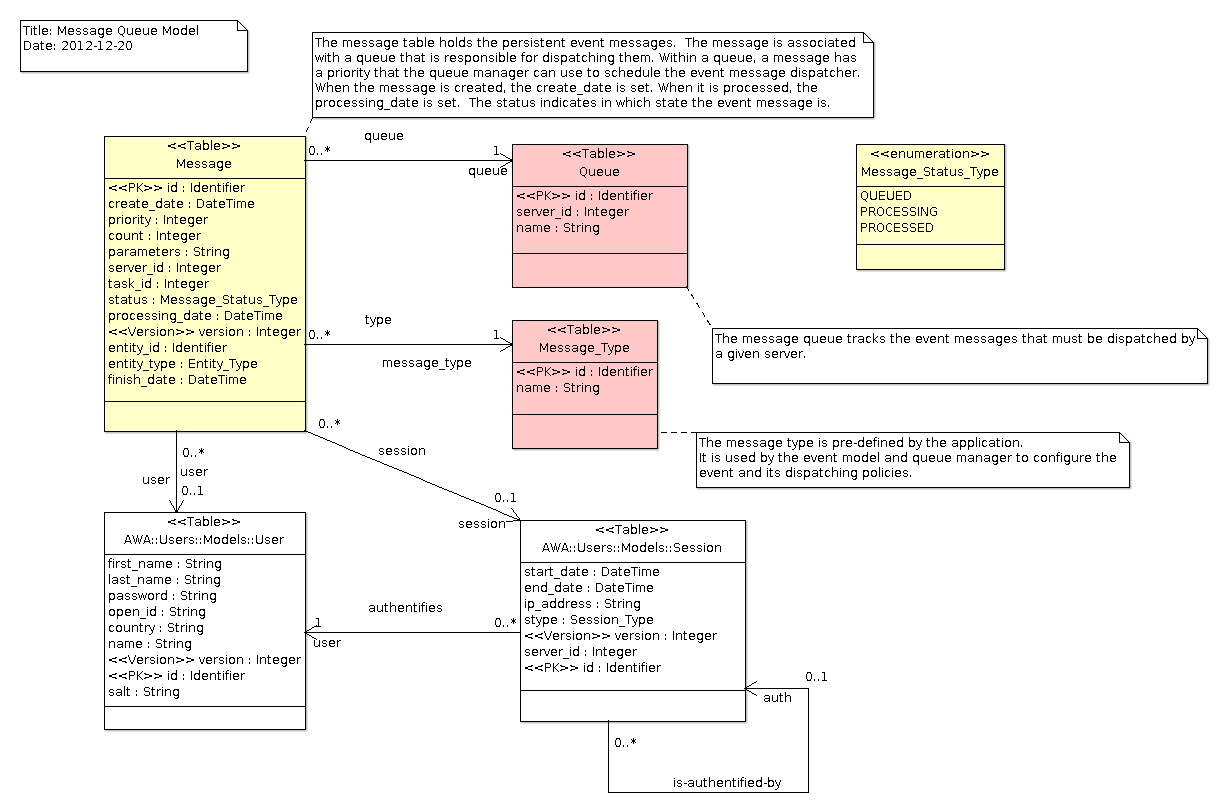
Event queues and dispatchers
The AWA.Events framework posts events on queues and it uses a dispatcher
to process them. There are two kinds of dispatchers:
-
Synchronous dispatcher process the event when it is posted. The task which posts the event invokes the Ada bean action. In this dispatching mode, there is no event queue. If the action method raises an exception, it will however be blocked.
-
Asynchronous dispatcher are executed by dedicated tasks. The event is put in an event queue. A dispatcher task processes the event and invokes the action method at a later time.
When the event is queued, there are two types of event queues:
-
A Fifo memory queue manages the event and dispatches them in FIFO order. If the application is stopped, the events present in the Fifo queue are lost.
-
A persistent event queue manages the event in a similar way as the FIFO queue but saves them in the database. If the application is stopped, events that have not yet been processed will be dispatched when the application is started again.
Data Model
AWA Commands
The AWA.Commands package provides a simple framework with commands that
allow to start, stop, configure and manage the web application. It is also
possible to provide your own commands. The command framework handles the
parsing of command line options, identification of the command to execute
and execution of the selected command.
Command Usage
SYNOPSIS
driver [-v] [-vv] [-vvv] [-c config-file ] command [-k file ] [ -d dir ] [ -p password ] [--password password ] [--passfile file ] [--passenv name ] [--passfd fd ] [--passask] [--passcmd cmd ] [--wallet-key-file file ]
DESCRIPTION
The AWA.Commands.Drivers framework integrates the Ada Keystore support
to access some sensitive configuration information such as passwords,
database connection strings, API secret keys. The use of the Ada Keystore
storage is optional. It is enabled when the -k _file_ option is
specified. When such secure storage is used, a primary password to
unlock the keystore is necessary. Passwords are retrieved using one
of the following options:
- by reading a file that contains the password,
- by looking at an environment variable,
- by using a command line argument,
- by getting the password through the ssh-askpass(1) external command,
- by running an external command,
- by using a GPG private key,
- by asking interactively the user for the password,
- by asking through a network socket for the password.
When the Ada Keystore is used, it is global to all the applications that are registered in the Web server container. To allow to differentiate application specific configuration, each configuration parameter is prefixed by the application name.
To create and update the keystore file, it is necessary to use the akt(1) tool. The tool provides many commands for the creation, insertion, removal and update of content that is stored in the keystore file.
If the keystore file was locked by using GPG, it is not necessary to specify any specific option to unlock the keystore. All is needed is the availability of the gpg2(1) command with the private key to unlock the keystore.
The server global configuration file that is read with the -c config-file option
can contain the following configuration:
| Name | Description |
|---|---|
| keystore-path | The path to the global keystore file |
| keystore-masterkey-path | The path of the file that contains the master keys |
| keystore-password-path | The path of the file that contains the keystore password |
| gpg-encrypt | When GPG is used, the GPG command to encrypt some content |
| gpg-decrypt | When GPG is used, the GPG command to decrypt some content |
| gpg-list-keys | When GPG is used, the GPG command to list the available GPG keys |
OPTIONS
The following options are recognized by the command driver:
-V
Prints the application version.
-v
Enable the verbose mode.
-vv
Enable debugging output.
-vvv
Enable debugging output.
-c config-file
Defines the path of the global server configuration file.
-k file
Specifies the path of the keystore file to open.
-p password
The keystore password is passed within the command line. Using this method is convenient but is not safe.
--passenv envname
The keystore password is passed within an environment variable with the given name. Using this method is considered safer but still provides some security leaks.
--passfile path
The keystore password is passed within a file that is read. The file must not be readable or writable by other users or group: its mode must be r??------. The directory that contains the file must also satisfy the not readable by other users or group members, This method is safer.
--passfd fd
The keystore password is passed within a pipe whose file descriptor number is given. The file descriptor is read to obtain the password. This method is safer.
--passask
The keystore password is retrieved by the running the external tool ssh-askpass(1) which will ask the password through either KDE, Gnome or another desktop interactive application. The password is retrieved through a pipe that the driver sets while launching the command.
--passcmd cmd
The keystore password is retrieved by the running the external command defined in cmd. The command should print the password on its standard output without end of line. The password is retrieved through a pipe that the driver sets while launching the command.
--wallet-key-file file
Defines the path of a file which contains the wallet master key file.
COMMANDS
The start command
driver start [--management-port PORT] [--port PORT] [--connection COUNT] [--upload DIR] [--tcp-no-delay] [--daemon] [--keystore PATH]
The start command allows to start the server and all applications that are
registered to the web container. When a keystore is specified, it is first
unlocked by using one of the unlock mechanism (password, GPG, ...).
Then, each application is configured by using its own configuration file
and a subset of the keystore secured configuration.
Once each application is configured, the web server container is started
to listen to the TCP/IP port defined by the --port=PORT option.
Applications are then started and they can serve HTTP requests through
the web server container.
At the same time, a management port is created and used exclusively by
the stop command to stop the web server container. The start command
will wait on that management port for the stop command to be executed.
The management port is configured by the --management=PORT option.
The management port is local to the host and cannot be accessed remotely.
When the --daemon option is used, the server will first put itself in
the background. This option is supported only under some Unix systems
like GNU/Linux and FreeBSD and more generally every system where
the daemon(3) C-library call is supported. On other systems, this option
has no effect.
The --tcp-no-delay option is supported for recent version of
Ada Web Server and configure the web server to use the TCP_NO_DELAY
option of the TCP/IP stack (strongly recommended).
The --upload=DIR option indicates to the web server container
the directory that can be used to store temporarily the uploaded files
that the server receives.
The --connection=COUNT option controls the maximum number of active
HTTP requests that the server can handle.
The setup command
driver setup [--management-port PORT] [--port PORT] [--connection COUNT] [--upload DIR] [--tcp-no-delay] [--daemon] [--keystore PATH] NAME
The setup command is very close to the start command but it starts
the Setup Application to configure the application by
using a web browser.
The stop command
driver stop [--management-port PORT] [--keystore PATH]
The stop command is used to inform a running web server container to stop.
The management port is used to connect to the web server container and stop it.
The management port is local to the host and cannot be accessed remotely.
The management port is configured with the --management-port=PORT option.
The migrate command
driver migrate [--application NAME] [--keystore PATH] [--execute]
The migrate command is provided to perform the database schema migration
when the application or one of its module is upgraded and uses a new database
schema. Each module is versionned and the migrate command handles the
schema upgrade for each module version included and used by the application.
It should be safe to execute this command multiple times since once a
database schema is migrated the command will detect this and do nothing.
By default the SQL migration scripts are not executed and the command prints the list of SQL scripts that will be executed if the migration is executed.
The --execute option runs the SQL migration scripts.
The list command
driver list [--application NAME] [--keystore PATH] [--users] [--jobs] [--sessions] [--tables]
The list command is intended to help in looking at the application
database and see some important information. Because the database is
specific to each application, it may be necessary to indicate the
application name by using the --application=NAME option.
The --tables option triggers the list of database tables with the
number of entries they contain.
The --users option triggers the list of users that are registered in
the application.
The --sessions option triggers the list of user connection sessions.
The --jobs option triggers the list of jobs that have been created
and scheduled.
The info command
driver info [--application NAME] [--keystore PATH] [--long-lines]
The info command reports the current configuration used by the
application. The configuration is extracted from the AWA default
XML configuration files and can be overriden by the application
specific configuration. The command allows to see what is the
actual configuration. The configuration is printed with the
configuration name and its associated value.
The list of configuration parameters are grouped in several categories:
Database configurationgives the configuration properties for the database configuration.Server faces configurationlists the configuration use by the Ada Servlets and Ada Server Faces.AWA Applicationlists the core AWA configuration properties.
Depending on whether a module is used by the application, a number of modules are listed with their configuration.
The --long-lines option triggers the list of database tables with the
number of entries they contain.
The permission command
driver permission [--allow PERM] [--deny PERM] [email...]
The permission command allows to list the permissions defined for users
and it also allows to grant or revoke permissions. When no argument are
defined, the command lists every permissions granted for a given user
with an email address and when an email address is defined, it lists the
permissions granted for that user. The output is similar to:
ACL     Permission:Workspace:Type:Entity                            Email
1601    wiki-space-create:1302:awa_workspace:1302                   user@proton.me
98      storage-create:1302:awa_workspace:1302                      user@proton.me
99      storage-delete:1302:awa_workspace:1302                      user@proton.me
100     folder-create:1302:awa_workspace:1302                       user@proton.me
The command provides a --allow and a --deny option to grant new permissions
or revoke existing permissions.
Integration
The AWA.Commands framework is split in several generic packages that
must be instantiated. The AWA.Commands.Drivers generic package is
the primary package that must be instantiated. It provides the core
command line driver framework on top of which the commands are implemented.
The instantiation needs two parameter: the name of the application and
the type of the web server container. When using Ada Web Server, the
following instantiation example can be used:
with Servlet.Server.Web;
with AWA.Commands.Drivers;
...
package Server_Commands is
   new AWA.Commands.Drivers
      (Driver_Name    => "atlas",
       Container_Type => Servlet.Server.Web.AWS_Container);
The Driver_Name is used to print the name of the command when
some usage or help is printed. The Container_Type is used to
declare the web container onto which applications are registered
and which provides the web server core implementation. The web
server container instance is available through the WS variable
defined in the Server_Commands package.
Once the command driver is instantiated, it is necessary to instantiate
each command that you wish to integrate in the final application.
For example, to integrate the start command, you will do:
with AWA.Commands.Start;
...
package Start_Command is new AWA.Commands.Start (Server_Commands);
To integrate the stop command, you will do:
with AWA.Commands.Stop;
...
package Stop_Command is new AWA.Commands.Stop (Server_Commands);
The instantiation of one of the command, automatically registers the command to the command driver.