Tutorial
Ada Web Application is a complete framework that allows to write web applications using the Ada language. Through a complete web application, the tutorial explains various aspects in setting up and building an application by using AWA.
The tutorial assumes that you have already installed the following software on your computer:
- The GNAT Ada compiler,
- The Ada Web Application framework and its associated dependencies (XML/Ada and AWS),
- The Dynamo code generator.
The ArgoUML modelization tool is provided by the Dynamo package. Since this is a Java application, it uses the Java JRE (either 1.8 or 1.11, the OpenJDK 1.11 is recommended).
The review web application
The review web application allows users to write reviews about a product, a software or a web site and share them to the Internet community. The community can read the review, participate by adding comments and voting for the reviewed product or software.
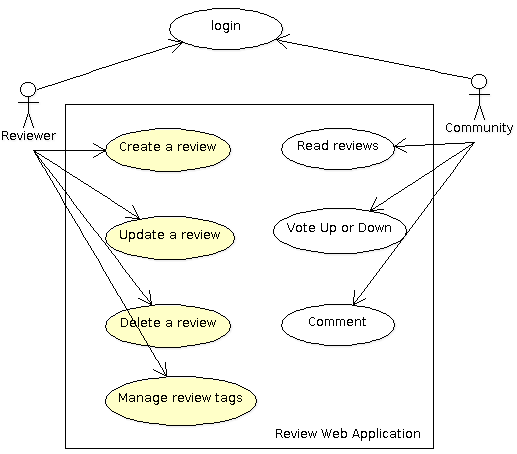
The AWA framework provides several modules that are ready to be used by our application. The login and user management is handled by the framework so this simplifies a lot the design of our application. We will see in the tutorial how we can leverage this to our review application.
Because users of our review web application have different roles, we will need permissions to make sure that only reviewers can modify a review. We will see how the AWA framework leverages the Ada Security library to enforce the permissions.
The AWA framework also integrates three other modules that we are going to use: the Tags Module, the Votes Module and the Comments Module.
Since many building blocks are already provided by the AWA framework, we will be able to concentrate on our own review application module.
Setting up the project
Project creation with Dynamo
The first step is to create the new project. Since creating a project from scratch is never easy we will use the Dynamo tool to build our initial review web application. Dynamo is a command line tool that provides several commands that help in several development tasks. For the project creation we will give:
- the output directory,
- the project name,
- the license to be used for the project,
- the project author's email address.
Choose the project name with care as it defines the name of the Ada root package that will be used by the project. For the license, you have the choice between GPL v2, GPL v3, MIT, BSD 3 clauses, Apache 2 or some proprietary license.
dynamo -o atlas create-project -l apache atlas email@domain.com
The Dynamo project creation will build the atlas directory and populate it with many files:
- A set of configure, Makefile, GNAT project files to build the project,
- A set of Ada files to build your Ada web application,
- A set of presentation files for the web application.
Once the project is created, we must configure it to find the Ada compiler, libraries and so on. This is done by the following commands:
cd atlas
./configure
At this step, you may even build your new project and start it. The make command will build the Ada
files and create the bin/atlas-server executable that represents the web application.
make generate build
bin/atlas-server start
Once the server is started, you may point your browser to the following location:
http://localhost:8080/atlas/index.html
Creating the review module with Dynamo
With the Ada Web Application framework, a web application is composed of modules where each module brings a specific functionality to the application. AWA provides a module for user management, another for comments, tags, votes, and many others. The application can decide to use these modules or not. The AWA module framework helps in defining the architecture and designing your web application.
For the review web application we will create our own module dedicated for the review management. The module will be an Ada child package of our root project package. From the Ada point of view, the final module will be composed of the following packages:
- A
Modulespackage represents the business logic of the module. It is provides operations to access and manage the data owned by the module. - A
Beanspackage holds the Ada beans that make the link between the presentation layer and business logic. - A
Modelspackage holds the data model to access the database content. This package is generated from UML and will be covered by a next tutorial.
To help in setting up a new AWA module, the Dynamo tool provides the
add-module command. You just have to give the name of the module,
which is the name of the Ada child package. Let's create our reviews module now:
dynamo add-module reviews
The command generates the new AWA module and modifies some existing files to register the new module in the application. You can build your web application at this stage even though the new module will not do anything yet for you.
Designing the data model
Our review web application will need to access a database to store the review information. For this, we must define a data model that will describe how the information is stored in the database and how we can access such information from Ada.
A Model Driven Engineering or MDE promotes the use of models to ease the development of software and systems. The Unified Modeling Language is used to modelize various parts of the software. UML is a graphical type modelling language and it has many diagrams but we are only going to use one of them: the Class Diagram.
The class diagram is probably the most powerful diagram to design, explain and share the data model of any application. It defines the most important data types used by an application with the relation they have with each other. In the class diagram, a class represents an abstraction that encapsulates data member attributes and operations. The class may have relations with others classes.
ArgoUML setup
When using a UML modelization, two specific profiles must be configured before using the tool:
- The Dynamo profile that describes the base data types for our UML model. These types are necessary for the code generator to work correctly.
- The AWA profile that describes the tables and modules provided by AWA. We will need it to get the user UML class definition.
These UML profiles are located in the /usr/share/dynamo/base/uml
directory after Dynamo and AWA are installed.
When you use the argouml command provided by the Dynamo package,
the UML profiles should already be accessible and you have nothing to setup.
If you have installed ArgoUML by downloading it, you must setup these UML profiles.
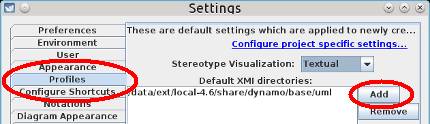
To configure ArgoUML,
go in the Edit -> Settings menu
and add the directory in the Default XMI directories list. Beware that you must
restart ArgoUML to be able to use the new profiles.
Once the directory is added, restart ArgoUML,
go again in Edit -> Settings menu and select the AWA.xmi and Dynamo.xmi
profiles. As soon as they are selected and applied on the configuration,
you should restart ArgoUML another time
for these two profiles to become usable.
Modelize the domain model in UML
The UML model must use a number of Dynamo artifacts for the code generation to work properly.
The artifact describes some capabilities and behavior for the code generator to perform its work.
Stereotype names are enclosed within << and >> markers. Dynamo uses the following stereotypes:
- The
DataModelstereotype must be applied on the package which contains the model to generate. This stereotype activates the code generation (other packages are not generated). - The
Tablestereotype must be applied to the class. It controls which database table and Ada type will be generated. - The
PKstereotype must be defined in at most one attribute of the class. This indicates the primary key for the database table. The attribute type must be an integer or a string. This is a limitation of the Ada code generator. - The
Versionstereotype must be applied on the attribute that is used for the optimistic locking implementation of the database layer. - The
Auditablestereotype can be applied to some attributes and relations when you want to audit changes to these attributes or relations. When used, the ADO framework will track changes and automatically record them in a specific auditing table.
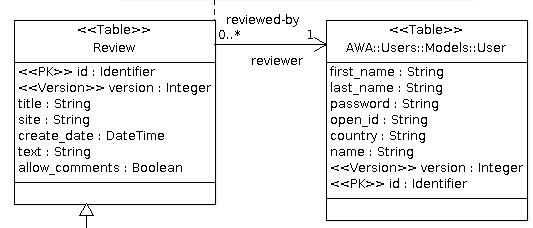
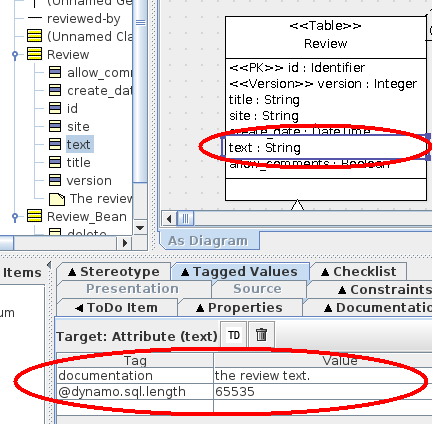
In our UML model, the Review table is assigned the Table stereotype
so that an SQL table will be created as well as an Ada tagged type to represent our table.
The id class attribute represents the primary key and thus has
the PK stereotype. The version class attribute is the database column
used by the optimistic locking
implementation provided by Ada Database Objects. This is why is has
the Version stereotype. The title, site, create_date,
text and allow_comments attributes represent the information we
want to store in the database table. They are general purpose attributes and thus
don't need any specific stereotype. For each attribute, the Dynamo
code generator will generate a getter and a setter operation that can be used in the Ada code.
To tune the generation, several UML tagged values can be selected and added on the table
or on a table attribute. By applying a stereotype to the class, several tagged
values can be added. By selecting the Tagged Values tab in ArgoUML
we can edit and setup new values. For the Review table, the
dynamo.table.name tagged value defines the name of the SQL database table,
in our case atlas_review.

The text attribute in the Review table is a string that can hold some
pretty long text. To control the length of the SQL column, we can set the
dynamo.sql.length tagged value and tell what is that length.
Once the UML model is designed, it is saved in the project directory uml.
Dynamo will be able to read the ArgoUML file format (.zargo extension) so
there is no need to export the UML in XMI.
Adding relations in the UML model
The final UML model of our review application is fairly simple.
We just added a table and a bean declaration. To benefit from the
user management
in AWA, we can use the AWA::Users::Models::User class that is defined in the AWA UML model.
The reviewed-by association will create an attribute reviewer
in our class. The code generator will generate a Get_Reviewer and
Set_Reviewer operation in the Ada code. The SQL table will contain
an additional column reviewer that will hold the primary key of the reviewer.
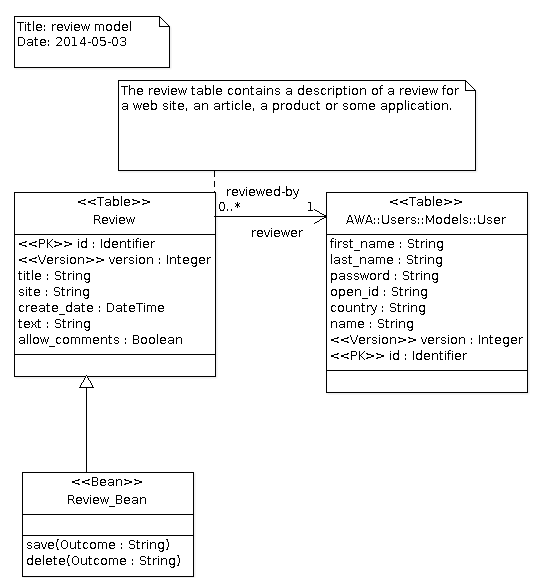
The Review_Bean class is an Ada Bean abstract class
that will be generated by the code generator. The Bean stereotype activates the bean code generator
and the generator will generate some code support that is necessary to turn the Review_Bean tagged
record into an Ada Bean aware type. We will see in the section
that we will only have to implement the save and delete operation
that are described in this UML model.
Makefile setup
The Makefile that was generated by
the Dynamo create-project
command must be updated to setup a number of generation arguments for
the UML to Ada code generator. Edit the Makefile to change DYNAMO_ARGS into:
DYNAMO_ARGS=--package Atlas.Reviews.Models db uml/atlas.zargo
The --package option
tells Dynamo to generate only
the model for the specified package. The db directory is the directory
that will contain the SQL model files.
Generating the Ada model
To run the generator, we can use the generate make target:
make generate
The Dynamo code generator reads the
file uml/atlas.zargo and the UML model it contains and generates:
- the Ada package
Atlas.Reviews.Modelswhich contains the definition of theReviewtable. The model files are created in the directorysrc/modelswhich is separate from your Ada sources. You can safely remove the files insrc/modelsand have them re-built by using Dynamo. It is not recommended to modify these files. - the SQL files to create the MySQL or SQLite database. Depending on the AWA modules which are used, the generated SQL files will contain additional tables that are used by the AWA modules. The SQL files are generated in the
db/mysql,db/sqliteanddb/postgresqldirectories.
Creating the database
Until now we designed our application UML model, we have our Ada code generated,
but we need a database with the tables for our application. We can do this
by using the create-database command in Dynamo. This command needs
several arguments:
- The directory that contains the SQL model files. In our case, this is
db. - The information to connect to the database, the database name, the user and its password. This information is passed in the form of a database connection string.
- The name of the database administration account to connect to the server and create the new database.
- The optional password for the database administration account.
If the MySQL server is running on your host and the admin account does not have any password, you can use the following command:
dynamo create-database \
   db 'mysql://localhost/demo_atlas?user=demo&password=demo' root
The create-database creates the database (demo_atlas) with
the tables that are necessary for the application. It also creates the demo
user and give it the necessary MySQL grants to connect to the demo_atlas
database.
Adding a creation form
We will start with the presentation layer by adding two pages in our web application. A first page will contain the list of reviews and the second page will contain a form to create or update a review.
AWA uses the Facelets technology to allow developers write and design the presentation layer of the web application. This technology is commonly used in J2EE applications. A page is represented by an XML file that contains HTML code, includes some stylesheets, Javascript files and makes the link between the presentation and the web application.
Adding pages
Dynamo provides at least two commands that help in adding presentation files.
The add-page command adds a simple page that can be edited and filled
with real content. We will use it for the creation of the page to display the list of reviews.
dynamo add-page reviews/list
The add-form command creates another template of page that includes
an HTML form to let a user submit some data to the web application.
dynamo add-form reviews/edit-review
These two commands will create the following files and they can now be modified.
./web/reviews/list.xhtml
./web/reviews/edit-review.xhtml
./web/reviews/forms/edit-review-form.xhtml
The create review form
In Facelets, an HTML form is created by using
the <h:form> component
from the HTML JSF namespace. This component
will generate the HTML form tag and it will also manage the form submission.
The Ada Server Faces provides a
set of widget components that facilitate the design
of web application. The <w:inputText> component renders a title field with
an HTML <label> and an HTML <input> text. We will use it to
let the user enter the review title and the site URL being reviewed. The HTML <textarea>
is provided by the JSF component <h:inputTextArea>. The review submit form
is defined by the following XML extract:
<h:form xmlns:h="http://java.sun.com/jsf/html
  xmlns:w="http://code.google.com/p/ada-asf/widget">
  <h:inputHidden id='entity-id' value='#{review.id}' required='false'/>
  <w:inputText title='Title' value='#{review.title}'/>
  <w:inputText title='Site' value='#{review.site}'/>
  <h:inputTextArea rows='20' value='#{review.text}'/>
  <h:commandButton value='Save'
     action='#{review.save}'/>
</h:form>
Before closing the <h:form> component, we will put a <h:commandButton> that will render the form submit button.
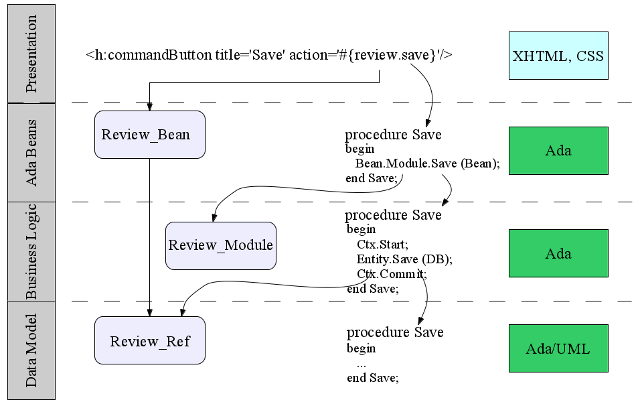
How it works
Before going further, let's see how all this works. The principle below is exactly the same for a Java Server Faces application.
First, when the page is rendered the UEL
expressions that
it contains are evaluated. The #{review.title}, #{review.site} and #{review.text} are replaced by the content provided by the review object
which is an Ada Bean provided by the Review_Bean tagged record.
When the page is submitted by the user, the input values submitted in the form
are saved in the review bean, again by using
the UEL expression.
The <h:commandButton> action is then executed. This is also
an UEL that
indicates a method to invoke on the bean.
To sum up, the UEL makes the binding between the presentation layer in Facelets files and the Ada or Java beans.
The Ada Bean layer provides getter
and setter to allow the UEL
to retrieve and set
values. For this, the Review_Bean tagged record implements two
operations that are defined in the [Bean](https://github.com/stcarrez/ada-util/source/browse/trunk/src/util-beans-basic.ads) interface:
overriding
function Get_Value (From : in Review_Bean;
                    Name : in String) return Util.Beans.Objects.Object;

overriding
procedure Set_Value (From : in out Review_Bean;
                    Name : in String;
                    Value : in Util.Beans.Objects.Object);
The Get_Value operation is called to retrieve one of the Ada Bean member attribute and
the Set_Value operation is called during form submission to set the member attribute.
Then the form button is pressed, the HTML form is submitted and received by the server.
The <h:form> component identifies the form submission and each input component
will validate the input fields. When everything has been validated, the <h:commandButton> component invokes the Save procedure that is declared as follows in the
Review_Bean tagged record:
overriding
procedure Save (Bean : in out Review_Bean;
                Outcome : in out Ada.Strings.Unbounded.Unbounded_String);
In the Ada Bean layer, we have to call the business logic to perform the
save operation.
The business logic part is provided by the Ada module whose initial skeleton was generated by Dynamo. That layer is responsible for defining how the data is created, retrieved and modified. As far as we are concerned, this is rather simple since we only have to verify the permission and save the review object within some transaction. In other modules, several objects may be envolved and more complex rules may be defined for the integrity and validity of these objects.
The last part of the architecture is the data model layer that was in fact generated by Dynamo from the UML model. It is responsible for loading and saving Ada objects into the database.
The Review_Bean type declaration
When we designed our UML model, we have created the Review_Bean
UML class and gave that class the Bean stereotype. We also declared
two operations (save and delete) on that class. With this
definition, Dynamo has generated in the Atlas.Reviews.Models package
the Review_Bean abstract type. This type is abstract because we have
to implement the Save and Delete operations. These are the two
operations that can be called by an action such as used by the <h:commandButton> component.
The Atlas.Reviews.Models package is a generated package and it must
not be modified. To implement our Ada Bean, we will add the Review_Bean
type in our own package: the Atlas.Reviews.Beans package.
For this the Review_Bean type will inherit from the Atlas.Reviews.Models.Review_Bean type and it will implement
the required operations. The type declaration looks like this:
package Atlas.Reviews.Beans is
...
type Review_Bean is new Atlas.Reviews.Models.Review_Bean with record
   Module : Atlas.Reviews.Modules.Review_Module_Access := null;
end record;
...
The Review_Bean implementation
The Save and Delete procedure must be implemented
and since the whole business logic is managed by the module layer, we just
have to call the associated module procedure as follows:
overriding
procedure Save (Bean : in out Review_Bean;
                Outcome : in out Ada.Strings.Unbounded.Unbounded_String);
begin
   Bean.Module.Save (Bean);
end Save;

overriding
procedure Delete (Bean : in out Review_Bean;
                Outcome : in out Ada.Strings.Unbounded.Unbounded_String);
begin
   Bean.Module.Delete (Bean);
end Delete;
The Review_Bean creation
The AWA framework must be able to create the review bean
instance when a page is processed. For this, there are three steps that are necessary:
- we must define a create function whose role is to allocate the
Review_Beaninstance and return it. At the same time, the function can setup some pre-defined values for the object. The Dynamo tool has generated for us an example of such function so that there is nothing to do.
function Create_Review_Bean (Module : in Atlas.Reviews.Modules.Review_Module_Access)
   return Util.Beans.Basic.Readonly_Bean_Access is
   Object : constant Review_Bean_Access := new Review_Bean;
begin
   Object.Module := Module;
   return Object.all'Access;
end Create_Review_Bean;
- the creation function must be registered in the AWA framework under a name that identifies the create function. Again, an example of this registration has been generated by Dynamo and we are going to use it as is.
Register.Register (Plugin => Plugin,
                 Name   => "Atlas.Reviews.Beans.Reviews_Bean",
                 Handler => Atlas.Reviews.Beans.Create_Review_Bean'Access);
- the last step is the configuration step. In the module XML configuration file, we must declare the Ada bean name and indicate what create function must be called to create it. We will use the managed-bean XML declaration that comes from Java Server Faces. We can declare as many Ada beans as we want each of them with a different name.
<managed-bean>
  <description>An example of a bean (change description and bean name)</description>
  <managed-bean-name>review</managed-bean-name>
  <managed-bean-class>Atlas.Reviews.Beans.Reviews_Bean</managed-bean-class>
  <managed-bean-scope>request</managed-bean-scope>
</managed-bean>
When the UEL
expression #{review.title} is used, the AWA framework looks for the Ada bean represented
by review and identified by the managed-bean-name entry. It then calls the create function
defined by the managed-bean-class. The Ada bean object is then stored either in the request context,
a session context or an application context. This is defined by the managed-bean-scope entry.
The request scope means that the Ada bean object is created once for each request. Concurrent page accesses will use their own Ada bean object instance. The session scope means that the Ada bean object is shared between requests
on the same session. The application scope means that the Ada bean object is global to the application, shared by
every request and every session.
Navigation rules
We have seen that when the review creation form is submitted the <h:commandButton>
component has invoked the Save procedure of our Review_Bean object.
The review object has been created and saved in the database and we kept the relation between
the new review and the user.
We must now decide what should happen for the user to see the result. We could display a new form, update some page content or redirect to a new page. All this is defined by the navigation rules.
The navigation rules is the Java Server Faces mechanism that controls and defines what is the next page or view that must be displayed to a user. The navigation rules are configured in the module XML configuration file.
In the definition below, the navigation rule defines that the user is redirected to
the page /reviews/list.xhtml if the current page was /reviews/edit-review.xhtml
and the operation returned success.
<navigation-rule>
  <from-view-id>/reviews/edit-review.xhtml</from-view-id>
    <navigation-case>
      <from-outcome>success</from-outcome>
      <to-view-id>/reviews/list.xhtml</to-view-id>
      <redirect/>
    </navigation-case>
</navigation-rule>
Creating the module
Adding the module operations
Now, we must add two operations on the business logic to save a review and delete a review.
The Dynamo code generator provides the add-module-operation command
that will help us in this task. Let's run it:
dynamo add-module-operation reviews review Save
dynamo add-module-operation reviews review Delete
The first parameter is the name of the module where the new operation is added.
This is the name of the module that was created by using the add-module
operation. In our case, this is the reviews module.
The second parameter is the name of the database entity or database table if you prefer.
The add-module-operation command modifies the Ada module specification
and body to define and implement the following operation:
package Atlas.Reviews.Modules is
...
procedure Save (Model  : in Review_Module;
                Entity : in out Atlas.Reviews.Models.Review_Ref'Class);
...
The object to save in the Review table is passed as parameter to the
Save operation. The procedure body that was generated is rather simple but functional:
it just saves the object in the database within a transaction. In many cases it is ready
to use but you may also need to modify the operation to either change the implementation
or even add new parameters.
Saving our review
Before saving our review entity object, we want to associate it with the current user. We have to know
who is the current user and for this we can use the AWA service context. The AWA service context is an object
that is provided by the AWA.Services.Contexts package and that provides some useful contextual
information for the business logic:
- It indicates the optional user that is authenticated and is doing the call,
- It gives access to the database connections that the business logic can use,
- It allows to manage database transactions.
The current service context is retrieved by using the AWA.Services.Contexts.Current function
and we can use the Get_User function to know the current user. The Save procedure
implementation is the following:
package ASC renames AWA.Services.Contexts;
procedure Save (Model  : in Review_Module;
                Entity : in out Atlas.Reviews.Models.Review_Ref'Class) is
   Ctx   : constant ASC.Service_Context_Access := ASC.Current;
   DB    : ADO.Sessions.Master_Session := AWA.Services.Contexts.Get_Master_Session (Ctx);
begin
   Ctx.Start;
   if not Entity.Is_Inserted then
      Entity.Set_Reviewer (Ctx.Get_User);
      Entity.Set_Create_Date (Ada.Calendar.Clock);
   end if;
   Entity.Save (DB);
   Ctx.Commit;
end Save;
Setting up the permissions
Because we want to bring some minimal security to the review web application, we are going to setup some permissions that will be enforced by the business logic layer when a save or delete operation is done. The AWA framework uses the Ada Security to implement and enforce permissions. For this we need:
- An Ada definition of the permission,
- Adding a verification to enforce the permission in the new module operations,
- A definition of the permission rules.
Generating the permission
Dynamo provides the add-permissions command to help us in the first task.
It generates some Ada code that declares the permissions. It also
provides a default configuration for the new permissions.
dynamo add-permissions reviews review
The first parameter is the name of our module where the new permissions are declared and the second parameter is the name of the database entity. The command will modify the Ada module specification and add the following lines:
package Atlas.Reviews.Modules is
...
package ACL_Create_Reviews is new Security.Permissions.Definition ("review-create");
package ACL_Delete_Reviews is new Security.Permissions.Definition ("review-delete");
package ACL_Update_Reviews is new Security.Permissions.Definition ("review-update");
Each of these package instantiation, declares a single permission identified by a name.
Enforcing security
Now that we have our permission, we can enforce the security in the Save and
Delete operation. This is done by using the Check operation
provided by the AWA.Permissions package.
To verify that the user has the permission to create a new review, we can use the following call:
AWA.Permissions.Check (Permission => ACL_Create_Reviews.Permission);
This operation will verify that the user has the given permission and it will
raise the AWA.Permissions.NO_PERMISSION exception if this is not the case.
By raising such exception, the Check procedure acts as a barrier that grants
or not the access to the rest of the code.
Now, if we have a review to modify, we will use the update permission and
also give the review object to the Check operation so that it can verify
if that particular review can be modified.
AWA.Permissions.Check (Permission => ACL_Update_Reviews.Permission,
                       Entity => Entity);
Configuring the permission
Until now we have created the permission and enforced it in the business logic.
We have not defined the rules that tell what is really checked to verify the permission.
The configuration part is defined in the XML file config/reviews.xml that
was generated when the reviews module was created. The add-permissions
command has modified the XML file to provide some default configuration. It has generated
a XML permission for the review-create, review-update and review-delete
permissions.
The review-create permission is defined as follows:
<auth-permission>
    <name>review-create</name>
</auth-permission>
This XML definition associate
the Authenticated Permission controller to the review-create
permission.
With that controller the permission is granted if the security context has a principal
(ie, a user is authenticated).
The review-update permission has another definition that we must change.
Basically, we want that only the reviewer that created the review can update the review.
For this we will use the entity permission controller provided by AWA. The XML
definition is the following:
<entity-permission>
    <name>review-update</name>
    <entity-type>altas_review</entity-type>
    <sql>
       SELECT r.id FROM atlas_review AS r
       WHERE r.id = :entity_id AND r.reviewer_id = :user_id
    </sql>
</entity-permission>
When the permission is checked, the entity permission controller will use the SQL statement to verify the permission. The SQL statement has three parameters:
user_idis the ID of the user associated with the security context. If there is no authentified user, the permission is refused.entity_idis the ID of the database entity as passed to theCheckprocedure and propagated to the permission controller.entity_typeis a unique number that identifies the database entity type or database table if you prefer. It is created and setup automatically according to the entity type defined in theentity-typeXML member. It is not used in our example.
At the end, the above SQL statement verifies that the review exists and was created by the current user.
Using database queries
Our next step is now to list the reviews that have been created. We need to add a page that will list the reviews and we need to implement a database query to fetch the information.
Adding database queries
Since we need to access the list of reviews from the XHTML files, we will map the SQL query result to a list of Ada Beans objects. For this, an [XML query mapping|https://code.google.com/p/ada-ado/wiki/QueryMapping] is created to tell how to map the SQL query result into some Ada record. The XML query mapping is then processed by Dynamo to generate the Ada Beans implementation. The XML query mapping is also read by AWA to get the SQL query to execute.
A template of the XML query mapping can be added to a project by using the dynamo
add-query command. The first parameter is the module name (reviews)
and the second parameter the name of the query (list). The command will generate the file
db/reviews-list.xml.
dynamo add-query reviews list
The generated XML query mapping is an example of a query. You can replace it or update it
according to your needs. The first part of the XML query mapping is a class declaration
that describes the type to represent each row returned by our query. Within the class,
a set of property definition describes the class attributes with their type and name.
<query-mapping package='Atlas.Reviews.Models'>
    <class name="Atlas.Reviews.Models.List_Info" bean="yes">
        <comment>The list of reviews.</comment>
        <property type='Identifier' name="id">
            <comment>the review identifier.</comment>
        </property>
        <property type='String' name="title">
            <comment>the review title.</comment>
        </property>
        ...
    </class>
</query-mapping>
Following the class declaration, the query declaration describes a query
by giving it a name and describing the SQL statement to execute. By having the SQL statement
separate and external to the application, we can update, fix and tune the SQL without rebuilding
the application. The Dynamo code generator will use
the query declaration to generate a query definition that can be referenced and used from
the Ada code.
The SQL statement is defined within the sql XML entity. The optional
sql-count XML entity is used to associate a count query that can be used for the pagination.
We want to display the review with the author's name and email address. The list will be sorted by date to show the newest reviews first. The SQL to execute is the following:
<query-mapping package='Atlas.Reviews.Models'>
   ...
    <query name='list'>
       <comment>Get the list of reviews</comment>
       <sql>
SELECT
      r.id,
      r.title,
      r.site,
      r.create_date,
      r.allow_comments,
      r.reviewer_id,
      a.name,
      e.email,
      r.text
FROM atlas_review AS r
INNER JOIN awa_user AS a ON r.reviewer_id = a.id
INNER JOIN awa_email AS e ON a.email_id = e.id
ORDER BY r.create_date DESC
    LIMIT :first, :last
       </sql>
       <sql-count>
    SELECT
      count(r.id)
    FROM atlas_review AS r
       </sql-count>
    </query>
</query-mapping>
The query has two named parameters represented by :first and :last.
These parameters allow to paginate the list of reviews.
The complete source can be seen in the file: db/reviews-list.xml.
Once the XML query is written, the Ada code is generated by Dynamo by reading the UML
model and all the XML query mapping defined for the application. Dynamo merges all the definitions into the target Ada packages and generates the Ada code in the src/model directory. You can use the generate
make target:
make generate
or run the following command manually:
dynamo generate db uml/atlas.zargo
From the List_Info class definition, Dynamo generates the
List_Info tagged record. The record contains all the data members described in
the class XML entity description. The List_Info represents one row returned
by the SQL query. The attributes of the List_Info can be accessed from the
XHTML files by using UEL expression and the property name defined for each attribute.
To describe the list of rows, Dynamo generates the List_Info_Beans package which instantiates the
Util.Beans.Basic.Lists generic package. This provides an Ada vector for the
List_Info type and an Ada bean that gives access to the list.
package Atlas.Reviews.Models is
  ...
  type List_Info is new Util.Beans.Basic.Readonly_Bean with record
  ...
   package List_Info_Beans is
      new Util.Beans.Basic.Lists (Element_Type => List_Info);
   package List_Info_Vectors renames List_Info_Beans.Vectors;
   subtype List_Info_List_Bean is List_Info_Beans.List_Bean;
   subtype List_Info_Vector is List_Info_Vectors.Vector;
   Query_List : constant ADO.Queries.Query_Definition_Access;
   ...
end Atlas.Reviews.Models;
The generated code can be seen in src/model/atlas-reviews-models.ads.
Implementing the review list bean
In order to access the list of reviews from the XHTML facelet file, we must create an Ada bean that provides the list of reviews. This Ada bean is modelized in the UML model and we define:
- A set of attributes to manage the review list pagination (
page,page_size,count) - An Ada bean action that can be called from the XHTML facelet file (
load)
The Review_List_Bean tagged record will hold the list of reviews for us:
package Atlas.Reviews.Beans is
  ...
   type Review_List_Bean is new Atlas.Reviews.Models.Review_List_Bean with record
      Module       : Atlas.Reviews.Modules.Review_Module_Access := null;
      Reviews      : aliased Atlas.Reviews.Models.List_Info_List_Bean;
      Reviews_Bean : Atlas.Reviews.Models.List_Info_List_Bean_Access;
   end record;
   type Review_List_Bean_Access is access all Review_List_Bean'Class;
end Atlas.Reviews.Beans;
We must now implement the Load operation that was described in the UML model
and we are going to use our list query. For this, we use the ADO.Queries.Context to setup the query to retrieve the list of reviews.
A call to Set_Query indicates the query that will be used. Since that query needs two
parameters (first and last), we use the Bind_Param operation to
give the two values. The list of reviews is then retrieved easily by calling the
Atlas.Reviews.Models.List operation that was generated by Dynamo.
package body Atlas.Reviews.Beans is
...
   overriding
   procedure Load (Into    : in out Review_List_Bean;
                   Outcome : in out Ada.Strings.Unbounded.Unbounded_String) is
      Session     : ADO.Sessions.Session := Into.Module.Get_Session;
      Query       : ADO.Queries.Context;
      Count_Query : ADO.Queries.Context;
      First       : constant Natural  := (Into.Page - 1) * Into.Page_Size;
      Last        : constant Positive := First + Into.Page_Size;
   begin
      Query.Set_Query (Atlas.Reviews.Models.Query_List);
      Count_Query.Set_Count_Query (Atlas.Reviews.Models.Query_List);
      Query.Bind_Param (Name => "first", Value => First);
      Query.Bind_Param (Name => "last", Value => Last);
      Atlas.Reviews.Models.List (Into.Reviews, Session, Query);
      Into.Count := ADO.Datasets.Get_Count (Session, Count_Query);
   end Load;
end Atlas.Reviews.Beans;
Review list bean creation
The AWA framework must be able to create an instance of the Review_List_Bean type.
For this, we have to declare and implement a constructor function that allocates
an instance of the Review_List_Bean type and setup some pre-defined values.
When the instance is returned, the list of reviews is not loaded.
package body Atlas.Reviews.Beans is
   ...
   function Create_Review_List_Bean (Module : in Atlas.Reviews.Modules.Review_Module_Access)
                                     return Util.Beans.Basic.Readonly_Bean_Access is
      Object  : constant Review_List_Bean_Access := new Review_List_Bean;
   begin
      Object.Module       := Module;
      Object.Reviews_Bean := Object.Reviews'Access;
      Object.Page_Size    := 20;
      Object.Page         := 1;
      Object.Count        := 0;
      return Object.all'Access;
   end Create_Review_List_Bean;
end Atlas.Reviews.Beans;
The constructor function is then registered in the Atlas.Reviews.Modules package within
the Initialize procedure. This registration allows to give a name for this constructor
function and be able to specify it in the managed-bean bean declaration.
package body Atlas.Reviews.Modules is
   ...
   overriding
   procedure Initialize (Plugin : in out Review_Module;
                         App    : in AWA.Modules.Application_Access;
                         Props  : in ASF.Applications.Config) is
   begin
      ...
      Register.Register (Plugin => Plugin,
                         Name   => "Atlas.Reviews.Beans.Review_List_Bean",
                         Handler => Atlas.Reviews.Beans.Create_Review_List_Bean'Access);
   end Initialize;
end Atlas.Reviews.Modules;
Review list bean declaration
The managed-bean XML declaration associates a name to a constructor function that will be called when the name is needed.
The scope of the Ada bean is set to request so that a new instance is created for
each HTTP GET request.
<managed-bean>
  <description>The list of reviews</description>
  <managed-bean-name>reviewList</managed-bean-name>
  <managed-bean-class>Atlas.Reviews.Beans.Review_List_Bean</managed-bean-class>
  <managed-bean-scope>request</managed-bean-scope>
</managed-bean>
Two other scopes are allowed: session and application.
The session scope indicates that the new instance is created and associated
with the user browsing session. It allows to share some instance between
several HTTP requests. Care must be made when designing the Ada bean instance
because concurrent HTTP requests can access and modify the Ada bean concurrently.
The application scope associates the new instance globally to the application.
It means the instance is shared across all requests concurrently.
Listing the reviews: the XHTML facelet presentation file
To load the reviews to be displayed we will use a JSF 2.2 view action.
The review list page has a parameter page that indicates the page number to be displayed.
The f:viewParam allows to retrieve that parameter and configure the reviewList
Ada bean with it. Then, the f:viewAction defines the action that will be executed
after the view parameters are extracted, validated and passed to the Ada bean. In our case, we will
call the load operation on our reviewList Ada bean.
<f:metadata>
    <f:viewParam id='page' value='#{reviewList.page}' required="false"/>
    <f:viewAction action="#{reviewList.load}"/>
</f:metadata>
To summarize, the reviewList Ada bean is created, then configured for the pagination
and filled with the current page content by running our SQL query by running the Load procedure.
The easy part is now to render the list of reviews. The XHTML file uses the
<h:list> component initializes the
Ada bean review to refer to the current row in the review list. We can then access
each attribute defined in the XML query mapping by using the property name of that attribute.
For example review.title returns the title property.
<h:list var="review" value="#{reviewList.reviews}">
    <div class='review' id="p_#{review.id}">
        <div class='review-title'>
            <h2><a href="#{review.site}">#{review.title}</a></h2>
            <ul class='review-info'>
                <li><span>By #{review.reviewer_name}</span></li>
                <li>
                    <h:outputText styleClass='review-date'
                                  value="#{review.date}"
                                  converter="dateConverter"/>
                </li>
                <h:panelGroup rendered="#{review.reviewer_id == user.id}">
                    <li>
                        <a href="#{contextPath}/reviews/edit-review.html?id=#{review.id}">
                           #{reviewMsg.review_edit_label}
                        </a>
                    </li>
                    <li>
                        <a href="#"
                           onclick="return ASF.OpenDialog(this, 'deleteDialog', '#{contextPath}/reviews/forms/delete-review.html?id=#{review.id}');">
                           #{reviewMsg.review_delete_label}
                        </a>
                    </li>
                </h:panelGroup>
            </ul>
        </div>
        <awa:wiki styleClass='review-text post-text' value="#{review.text}" format="dotclear"/>
    </div>
</h:list>
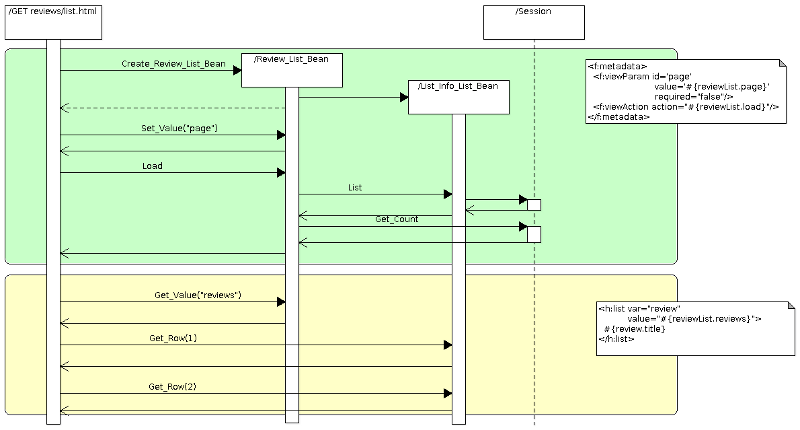
Understanding the request flow
Let's see the whole request flow to better understand what happens.
To display the list of reviews, the user's browser makes an HTTP GET request to the page /reviews/list.html.
This page maps to the XHTML file web/reviews/list.xhtml that we created in the Adding pages section.
The Ada Server Faces framework handles the request by first reading the XHTML file
and building a tree of components that represent the view to render. Within that tree
of component, the <f:metadata> component allows to make a pre-initialization of
components and Ada beans before the component tree is rendered.
For the pre-initialization, the reviewList Ada bean is created because it is referenced
in an EL expression used by the <f:viewParam> component or by the <f:viewAction>.
For this creation, the Create_Review_List_Bean constructor that we registered is called.
The page attribute is set on the reviewList Ada bean if it was passed as a URL
request parameter.
The load action is then called by Ada Server Faces
which triggers execution of the Load procedure and the current review list page
is retrieved by executing the SQL query.
As soon as the load action terminates, the rendering of the component tree can be
processed. The reviewList Ada bean contains the information to display and the
<h:list> component iterates over the list and renders each row at a time.